
When assembling the "Smart Insulin Patch", It is important to follow an order th


M
Generation Data
السجل
كلمة التلميح
نسخ
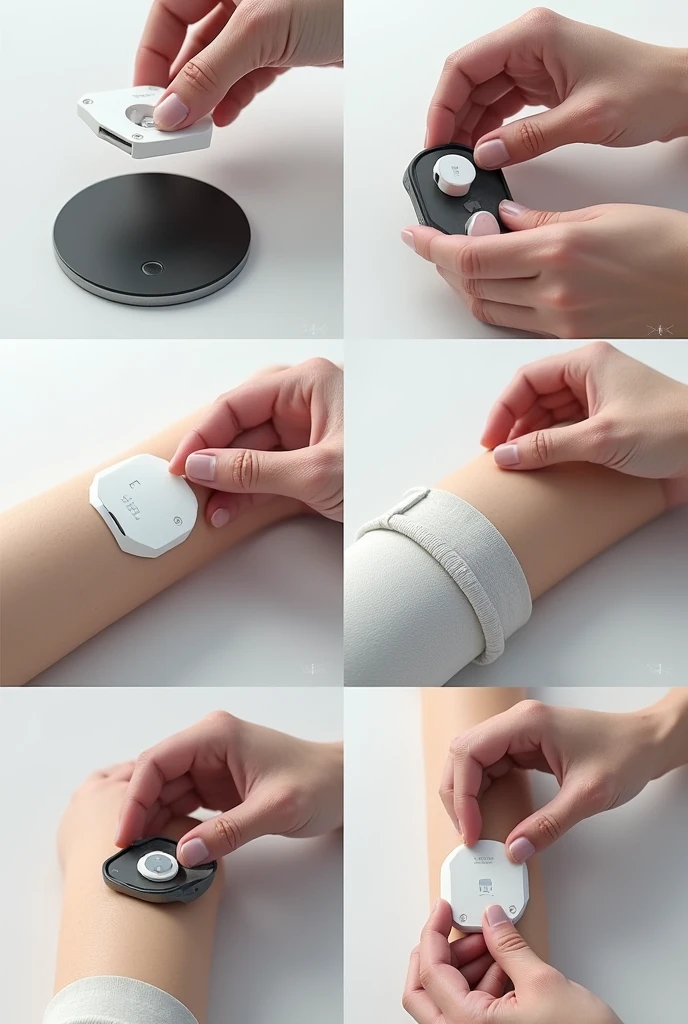
When assembling the "Smart Insulin Patch"
,
It is important to follow an order that ensures that each component is placed correctly for the device to function efficiently
..
Here I present a possible assembly order:
### **Prototype Assembly Order**
1
.
**Base of the Parche**
- **Description**: Start with the base of the patch
,
which is the main structure where all the components will be placed
.
- **Details**: It can be a layer of flexible material that allows the other components to adhere
..
2
.
**Placing the Glucose Sensor**
- **Description**: Install the glucose sensor on the bottom of the patch base
,
making sure it will be in direct contact with the skin
.
- **Details**: This component is essential for continuous monitoring
,
so it must be well positioned and secured
.
3
.
**Control Circuit Installation**
- **Description**: Place the control circuit near the sensor
,
so that you receive data directly and can process it quickly
.
- **Details**: This circuit will include the processor
,
the wireless communication module and connections to other components
.
4
.
**Micro Insulin Pump Assembly**
- **Description**: Attach the micro-insulin pump to the control circuit and connect the lines required for insulin delivery from the reservoir
..
- **Details**: The micro-pump must be connected to the control circuit so that it is automatically activated as needed
..
5
.
**Insulin Reservoir Integration**
- **Description**: Place the insulin reservoir in the center of the patch
,
connecting it to the micro-pump
.
- **Details**: Make sure the reservoir is well sealed and the connection to the micro-pump is secure
..
6
.
**Battery Connection**
- **Description**: Insert the rechargeable battery into its place
,
connecting it to the control circuit to power the device
.
- **Details**: The battery must be
معلومات
Checkpoint & LoRA

Checkpoint
SeaArt Infinity
#واقعي
#SeaArt Infinity
0 تعليق
0
0
0
تطبيقات الـAI السريعة من SeaArt
توليد فيديو AI
أطلق العنان لخيالك ودع AI يخلق روائع بصرية من أجلك.
مبادلة الوجه عبر الإنترنت مجانا
إبداع الفيديوهات والصور المضحكة أو الواقعية لمبادلة الوجه بسرعة

Wan 2.1 الفيديو من الصورة
حرّك الصور بحركة واقعية وتأثيرات سينمائية.
فلترة جيبلي
حوّل أي صورة إلى فن فريد بأسلوب جيبلي بنقرة واحدة فقط.
ممحاة الـAI
أزل الكائنات أو العلامات المائية أو الأشخاص غير المرغوب فيها من صورك بسهولة.

صانع أفاتار كرتوني
حوّل صورك إلى أفاتارات كرتونية فريدة على الفور.
استكشاف المزيد من تطبيقات الـAI