Typ
Other
Veröffentlichungsdatum
2023-07-24
Basismodelle
Other
Hello, guys!
Let me introduce the Image Dataset Manager.
This tool is great for organizing images and creating annotations for them. It can be invaluable in various fields where you need to work with a large number of images, from game development to scientific research. In our case, we will use it for creating datasets.
Instruction:
After installing the fast setup, we open IDM and click on "Create Dataset."
Now, we give a name to our future dataset and link folders with images. Then, we go to the "Images" tab.
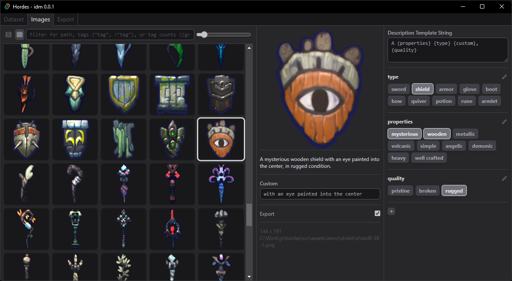
Here, we encounter three columns:
1 - All our images from all folders together. You can select images one by one or multiple using Shift. Ctrl + A selects all images. There's also a possibility to filter images by tags at the top.
2 - Information about the selected image. Full description and a field for a unique description {custom} for each image. There's also an "Export" checkbox that determines whether the image will be exported or not.
3 - A window with tags and the main dataset description formula.
Now, let's take a closer look at the third column since it's our main field for work. Click on "+" and create our first group of tags.
Group Name - The name of the group, which we will use to create the description formula.
Prefix - Text that will be added to the group at the beginning. For example, "With a" or just a space.
Suffix - Text that will be added at the end, e.g., a comma.
Join String - Text used to join 2 or more tags from the same group. By default, it's just a space.
Tag List - Enter our tags here.
Description Template String - Here, we enter the formula based on which the description will be constructed. We use {Group Name}, for example:
Using the formula and tag groups provides almost limitless possibilities for descriptions!
Once the dataset description is ready, it's time to proceed to export.
Center crop/Resize - Allows manipulation of image sizes.
Flatten alpha - Fills the alpha channel with the chosen color.
Export Path - The path where the dataset will be saved. There's an option to save all images separately by groups. For this, use the formula {30/Class}_{Class}.
{30/Class} - Calculates the number of required repetitions for 1 epoch based on the number of images. In my tests, I found that the number 30 works well for medium datasets targeting 7-8 epochs.
{Class} - Adds the necessary tag group name to the filename.
As a result, I obtained the following dataset:
Done!
As you can see, this tool is very simple to use and yet powerful when it comes to annotating a large number of images.
The tool is still in its early version and actively being developed. If you want to participate in the development or report a bug, you can refer to the appropriate branches on the project's GitHub.
My Patreon where I post guides and models
Thank you for your attention!

1. Dieses Modell dient nur Lernzwecken. Urheber- und Auslegungsrechte liegen beim Originalautor.
2. Bist du der Originalautor eines Modells, kontaktiere uns bitte zur Authentifizierung über unsere offiziellen Kanäle. Wir schützen die Rechte aller Schöpfer. Hier klicken, um es zu verifizieren.
