What are we going to do? We're going to use the power of artificial intelligence to create a charset (those character sheets for games!) almost automatically. Imagine having the front, side, and back views of your character, all consistent and ready to be animated! 🕹️✨
⚠️ Important Notice: Where do you use ComfyUI?
The following information, up to the end of Step 2, is intended for those who have ComfyUI installed on their own computer (local installation).
If you are using an online platform like Seaart, the MV Adapter and its models are likely already installed for you! 🎉 In that case, you can skip directly to Step 3 and start creating! 🚀
Step 0: Initial Setup (For Local Installation) 🛠️
- Open ComfyUI! 💻 This is where the magic happens on your PC.
- Keep it Updated! It's super important to ensure everything works correctly. If you haven't updated in a while, it might be a good time to do it now. 😉Tip: There is usually an update.bat or update.sh file in the ComfyUI folder. Run it!
Step 1: Install the MV Adapter (For Local Installation) ✨📥
- Go to the custom_nodes folder inside your ComfyUI directory. This is where the "extras" live!
- Open the Terminal/Command Prompt inside this folder. (On Windows, type cmd in the folder's address bar and press Enter. On Mac/Linux, right-click and "Open in Terminal").
- Type the magic command: git clone https://github.com/PRIS-CV/MV-Adapter-ComfyUI.git and press Enter. ⌨️This will download the MV Adapter files for you.
- Restart ComfyUI! 🔄 Close and open it again. This is important so that it recognizes the new "magic" you've installed.
Step 2: Download the Essential Models (For Local Installation) 📚💾
The MV Adapter needs some special files to work. They are called "models" or "checkpoints."
- Go to the project's GitHub page: https://github.com/PRIS-CV/MV-Adapter-ComfyUI
- Look for the "Download Models" section (or something similar). There you will find links to download the files. 🌐
- Where to place each file:MV Adapter .pth files (e.g., mv_adapter_v1_lora.pth): Place them in the ComfyUI/models/controlnet folder.IP Adapter .bin files (e.g., ip-adapter-plus_sd15.bin): Place them in the ComfyUI/models/ipadapter folder.Important: If these folders (controlnet, ipadapter) don't exist, create them inside ComfyUI/models. 📂
Step 3: Building Your First Workflow (From Your Idea to a Charset!) 💡➡️🖼️🖼️🖼️
(This part is for everyone! Users of local installations and platforms like Seaart)
- Load an Example (The Easy Way!): The simplest way to start is by finding a pre-made workflow.On the MV Adapter's GitHub or on sites like OpenArt, look for "MV Adapter" workflows. Download the .json file or copy the workflow image.In ComfyUI, drag and drop this file/image onto the canvas. It will set up most of the boxes for you! 🎉
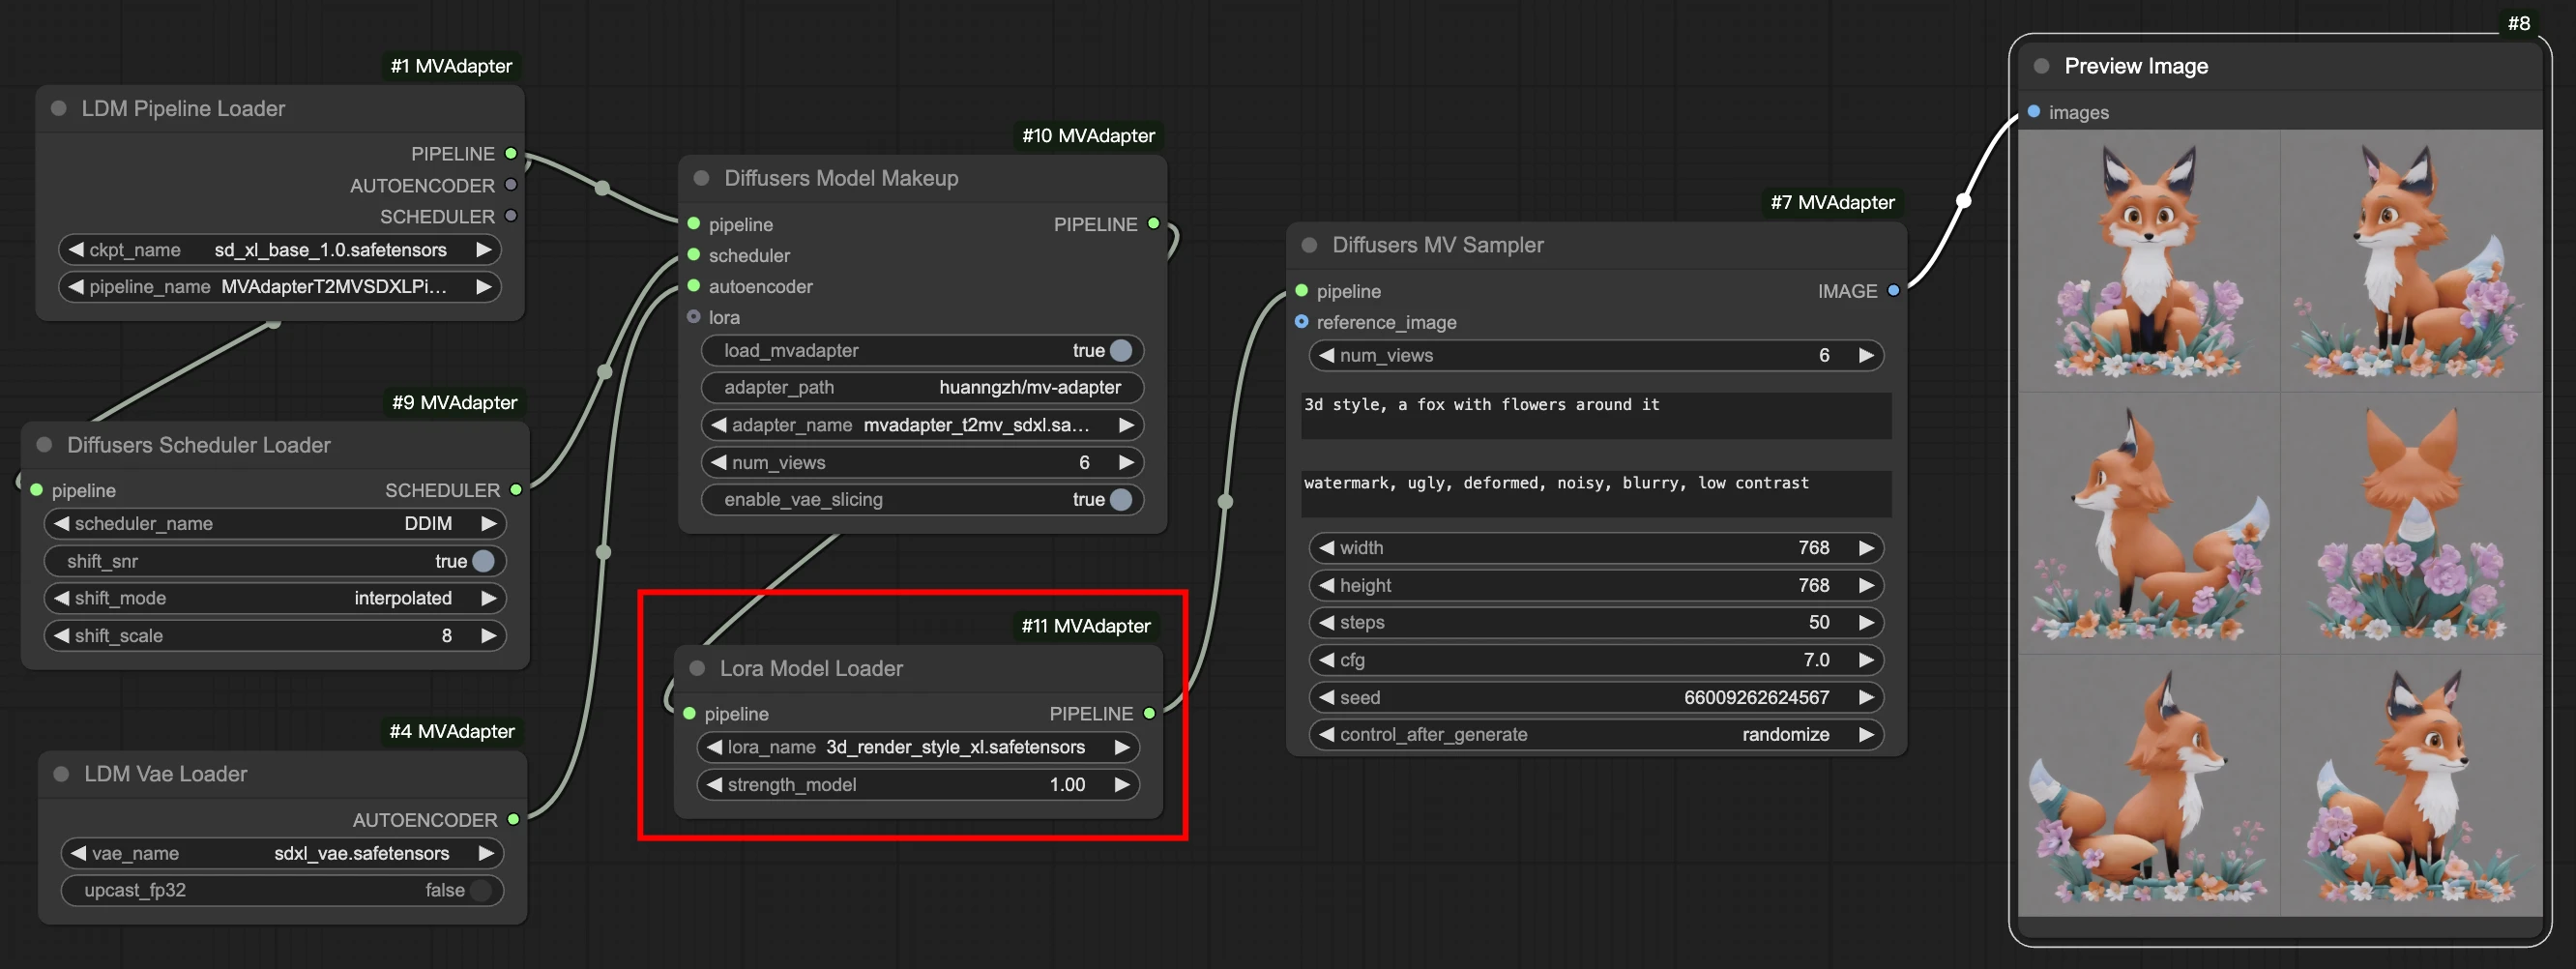
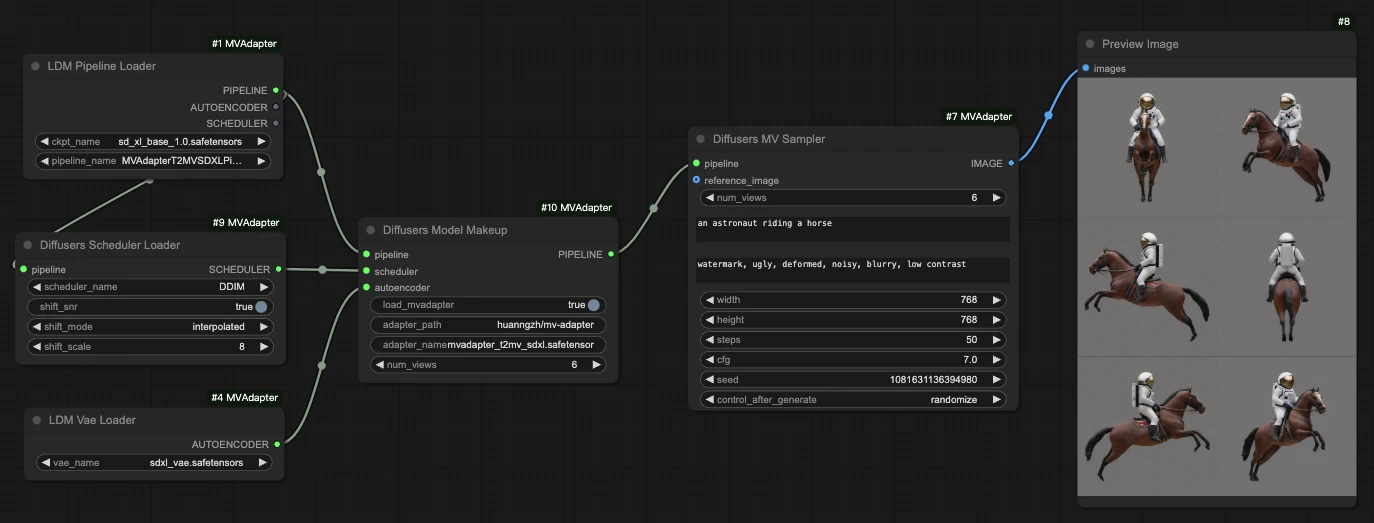
- Connect the Nodes: If you're building from scratch, the idea is to connect a Load Checkpoint (your style model) to a CLIPTextEncode (your prompt) and feed everything into the special MV-Adapter nodes, which in turn connect to the KSampler (the generator) to finally create the images.
- Write your Prompt! 📝In the positive CLIPTextEncode node, describe your character (e.g., knight, full plate armor, standing still, full body shot). 🛡️In the negative CLIPTextEncode node, type what you DON'T want (e.g., bad quality, blurry, cropped). Tip for charsets: Use terms like full body shot, standing, and neutral pose to ensure the entire character appears and is in a good position for animating later!
- Adjust the Number of Views: In the MV Adapter node, look for "num_views" or "num_frames". Set how many angles you want (e.g., 4 for front, side, back, other side, or 6 for more detail). 🔢
- Click "Queue Prompt"! ▶️ ComfyUI will generate the different views of your character, the perfect base for your charset! 🤩
Step 4: Using an Existing Image (Turn Your Concept Art into a Charset!) 🎨➡️🖼️🖼️🖼️
If you've already drawn the front view of your character and want the rest, this is the way to go!
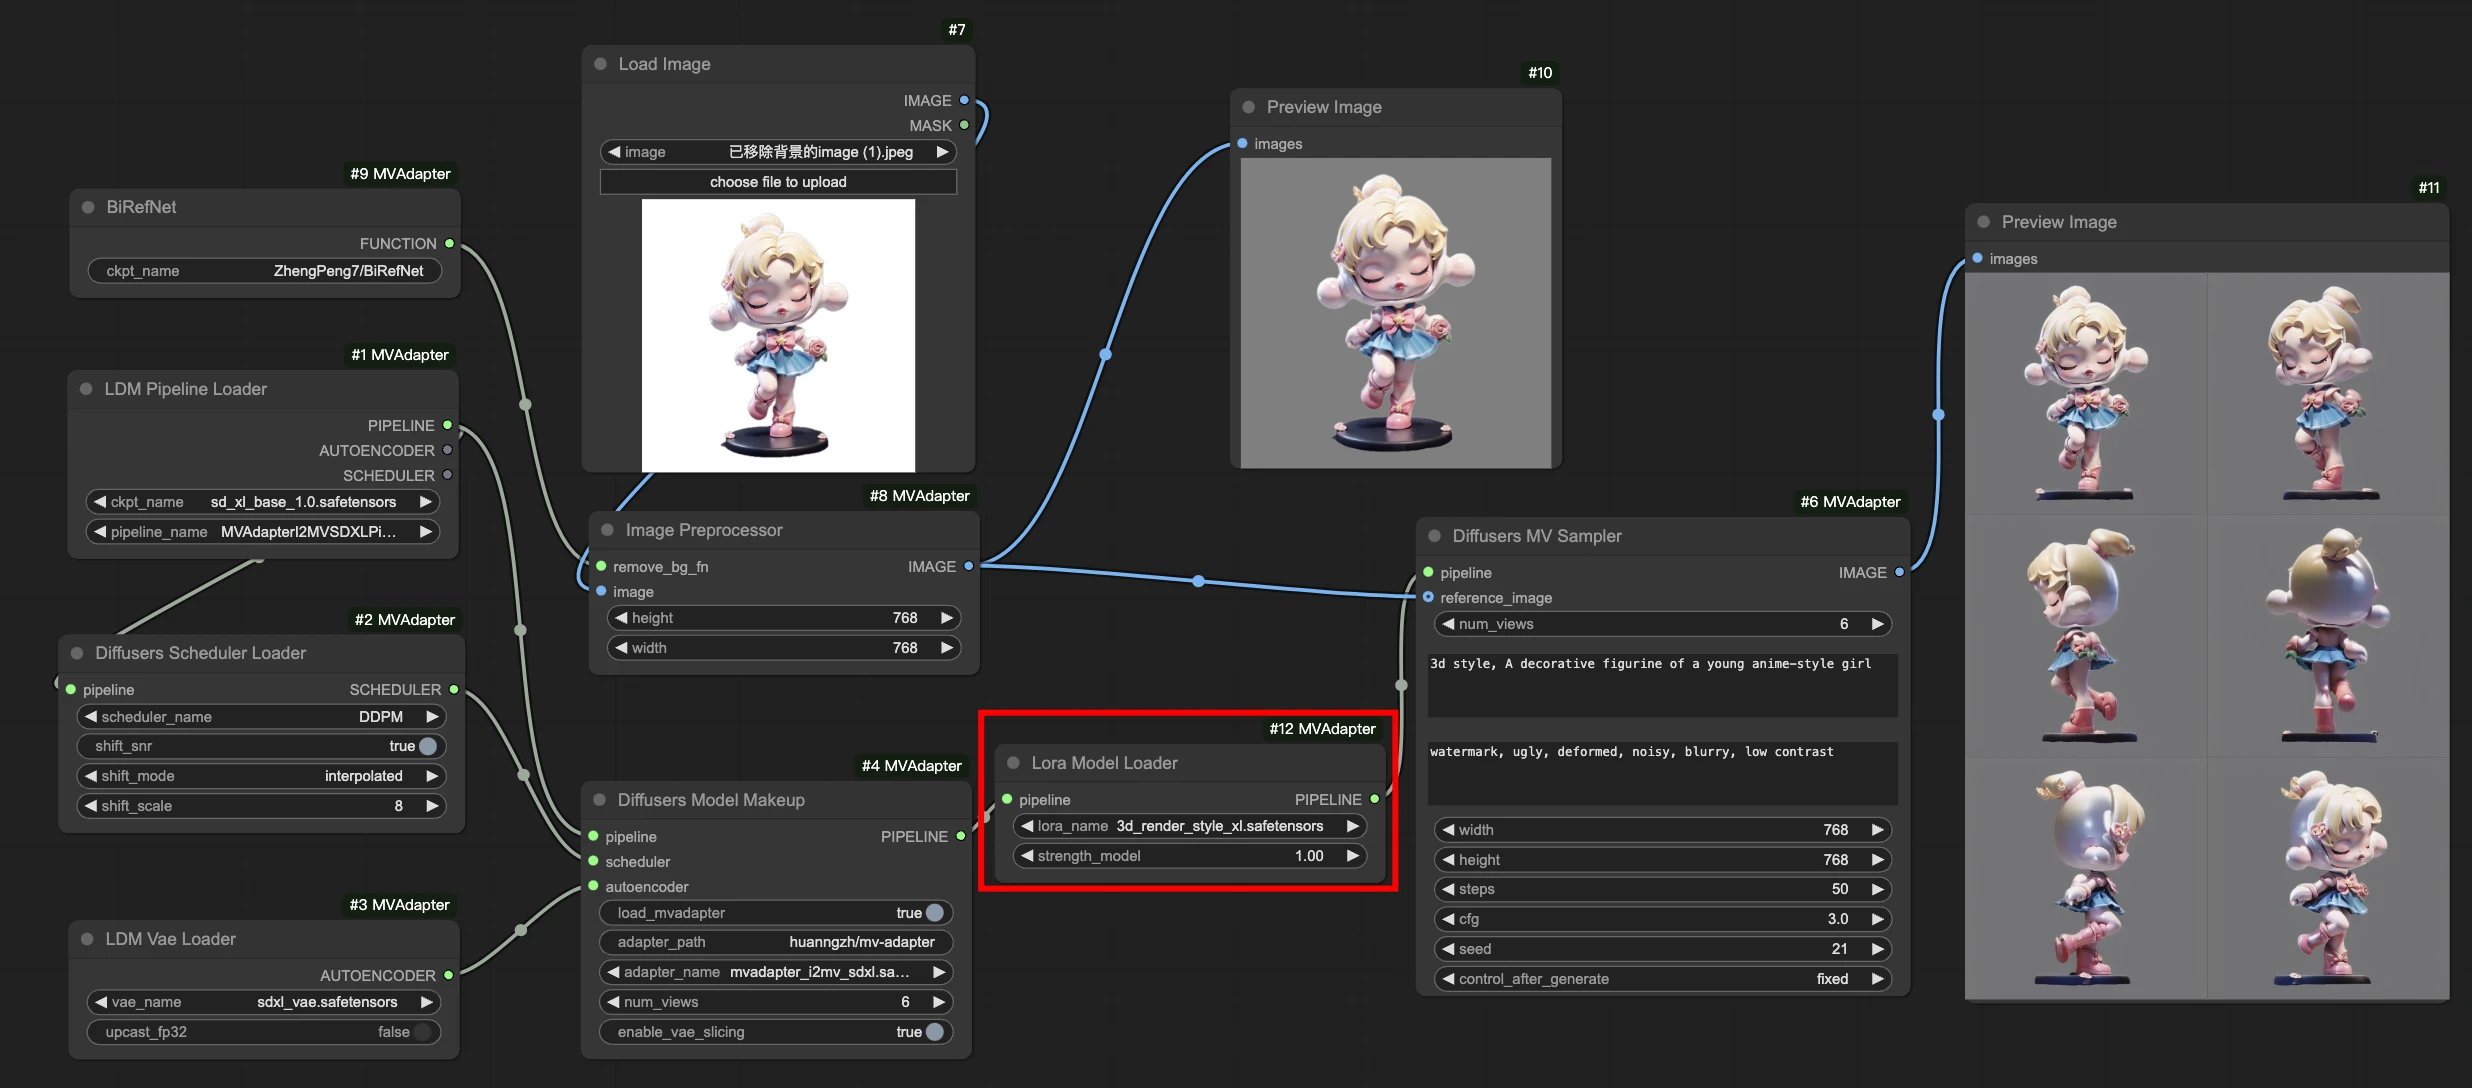
- Load an Image-to-MV Workflow: Look on GitHub for an example (e.g., image_to_mv_workflow.json) and drag it into ComfyUI.
- Essential Nodes: The difference here is that you will use a Load Image node to load your art and a CLIPVisionEncode node so the AI can "see" your image.
- Load Your Image: In the Load Image node, select your concept art. 📍
- Adjust the Prompts: Provide a brief description to help the AI (e.g., a cute slime monster). 🟢
- Queue Prompt! ▶️ ComfyUI will use your image as a reference to create the other views, maintaining the style and details!
Step 5: Extra Tips for a Perfect Charset! 👑💡
- Pixel Art Models: Want a retro game style? Look for "pixel art" checkpoints or Loras on Civitai to add that special touch! 🕹️
- Consistency is King: If the results aren't 100% consistent, try increasing the "weight" of the MV Adapter or IP Adapter in their respective nodes.
- Background: To make life easier when putting it into your game, use a " Background" node after generating the images. There are several available as custom_nodes!
- Assemble the Spritesheet: After you have the images (front, side, back), use an image editor like Photoshop, GIMP, or Aseprite to combine them into a single sheet (your final charset!). 🖼️➡️📜
https://github.com/huanngzh/ComfyUI-MVAdapter/blob/main/assets/comfyui_i2mv_lora.png There you go! Now the guide is even clearer for all types of users. Have fun creating! ✨🚀🎮