유형
Other
게시 날짜
2024-04-19
기본 모델
Other
This article is a brief summary of how to get access to and use the Groq LLM API for free, and how to use it inside ComfyUI.
The article version can be found here.
Create your groq account here. This is all free, and you can use the API for free with some rate limits to how many times per minute, per day and the number of tokens you can use. The limits are currently very generous.
As of the time of writing (2024-04-19), the rate limits are:
Go to the GroqCloud Playground and find the API Keys section in the menu on the left side.
Copy the API key from the next dialogue that pops up. This is the only time you will see this code. Make sure you keep a backup in case you want to use exactly this one later.
It doesn't really matter as you can just create a new key and switch to that one.
Go to the GroqCloud Playground and enter a system message in the field on the left side. You are now ready to test your customized chat model.
Enter your chat message in the User field and press CTRL + ENTER to send the message.
Towards the bottom of the Playground page, there should be a "View code" button. This is showing you the python script running your query and instructions in the background.
This should pop up a window with the current code:
from groq import Groq

client = Groq()
completion = client.chat.completions.create(
    model="mixtral-8x7b-32768",
    messages=[
        {
            "role": "system",
            "content": "You are an expert python programmer and your mission is to help the user with their programming troubles."
        },
        {
            "role": "user",
            "content": "I need help to write a script. Please write a hello world script for me."
        },
        {
            "role": "assistant",
            "content": "Sure, I'd be happy to help you write a \"Hello, World\" script in Python! Here's an example:\n```python\nprint(\"Hello, World!\")\n```\nWhen you run this script, it will display the message \"Hello, World!\" in the console. Let me know if you have any questions or if there's anything else I can help you with!"
        }
    ],
    temperature=1,
    max_tokens=1024,
    top_p=1,
    stream=True,
    stop=None,
)

for chunk in completion:
    print(chunk.choices[0].delta.content or "", end="")
If you remove the reply, you actually have a valid code snippet that you can run locally using python to send a query to the API. Removing it, now the code looks like this:
from groq import Groq

client = Groq()
completion = client.chat.completions.create(
    model="mixtral-8x7b-32768",
    messages=[
        {
            "role": "system",
            "content": "You are an expert python programmer and your mission is to help the user with their programming troubles."
        },
        {
            "role": "user",
            "content": "I need help to write a script. Please write a hello world script for me."
        }
    ],
    temperature=1,
    max_tokens=1024,
    top_p=1,
    stream=True,
    stop=None,
)

for chunk in completion:
print(chunk.choices[0].delta.content or "", end="")The only thing you need to do now is to add your API key to your script. Add this to the client = Groq() line.
client = Groq(api_key="gsk_xxxxxxxxxxxxxxxxxxxxxxxxxx")Running this script in python should now work.
Note that you will need to install the groq library first. You can do this by running pip install groq. Ideally you should have created a separate environment before running all this, but that's a separate topic. You can find a tool I wrote to help you create a virtual environment here. Alternatively follow any guide online on how to set up a virtual environment for python.
Additional note: It's not recommended to hard-code your API key into code like this. It's better to store it as an environmental variable in your system, or create a .ini-file which contains your code using the configparser library for example. ChatGPT can help you with this.
Using the above method, I created a node to use in ComfyUI. It's available on my node pack on Github: https://github.com/MNeMoNiCuZ/ComfyUI-mnemic-nodes?tab=readme-ov-file#-groq-llm-api-node.
Install the node pack using ComfyUI Manager, or by cloning the repository manually into your /ComfyUI/custom_nodes/-directory.
Once installed, you will need to enter your API key into the config-file (ComfyUI\custom_nodes\ComfyUI-mnemic-nodes\nodes\groq), and then you should be good to go! Restart ComfyUI and find the Groq LLM API node and add it to your workflow.
Additional information can be found on the Github page.
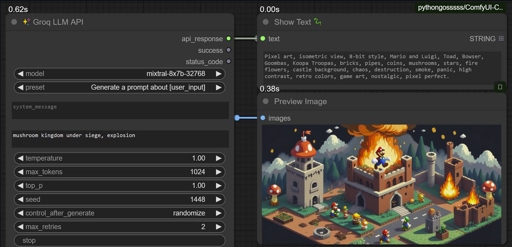
Below are a few screenshots to show what the node is capable of.
Don't hesitate to ask questions below.

1. 재게시된 모델의 권리는 원 제작자에게 있습니다.
2. 모델 원작자가 모델을 인증받으려면 공식 채널을 통해 SeaArt.AI 직원에게 문의하세요. 저희는 모든 창작자의 권리를 보호하기 위해 노력합니다. 인증하러 이동
