
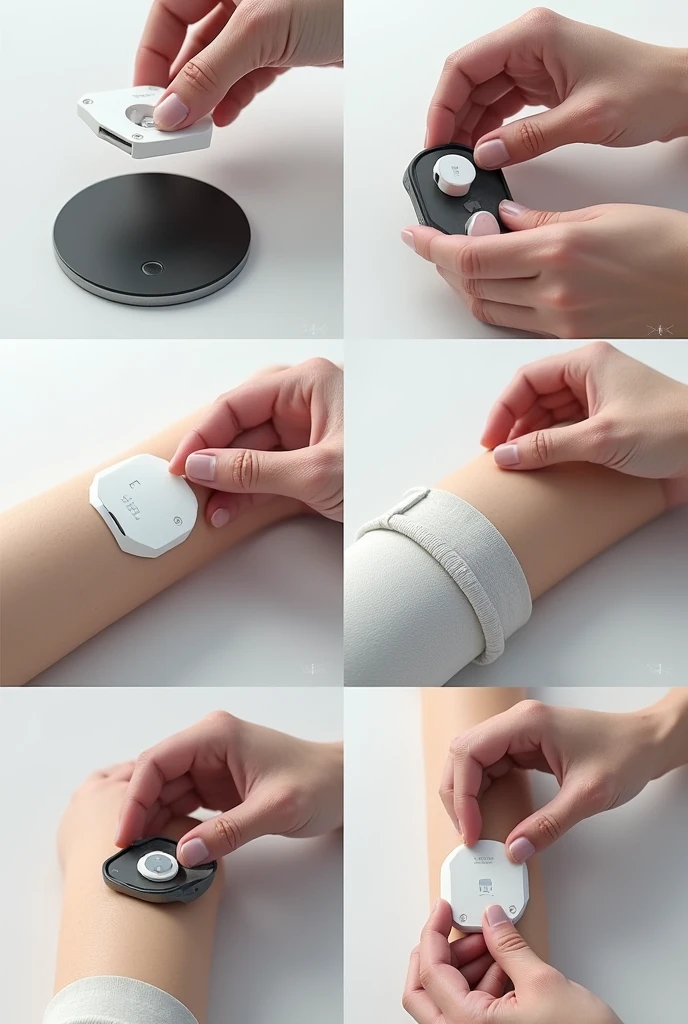
When assembling the "Smart Insulin Patch", It is important to follow an order th


M
Generation Data
Запись
Подсказки
Копировать подсказки
When assembling the "Smart Insulin Patch"
,
It is important to follow an order that ensures that each component is placed correctly for the device to function efficiently
..
Here I present a possible assembly order:
### **Prototype Assembly Order**
1
.
**Base of the Parche**
- **Description**: Start with the base of the patch
,
which is the main structure where all the components will be placed
.
- **Details**: It can be a layer of flexible material that allows the other components to adhere
..
2
.
**Placing the Glucose Sensor**
- **Description**: Install the glucose sensor on the bottom of the patch base
,
making sure it will be in direct contact with the skin
.
- **Details**: This component is essential for continuous monitoring
,
so it must be well positioned and secured
.
3
.
**Control Circuit Installation**
- **Description**: Place the control circuit near the sensor
,
so that you receive data directly and can process it quickly
.
- **Details**: This circuit will include the processor
,
the wireless communication module and connections to other components
.
4
.
**Micro Insulin Pump Assembly**
- **Description**: Attach the micro-insulin pump to the control circuit and connect the lines required for insulin delivery from the reservoir
..
- **Details**: The micro-pump must be connected to the control circuit so that it is automatically activated as needed
..
5
.
**Insulin Reservoir Integration**
- **Description**: Place the insulin reservoir in the center of the patch
,
connecting it to the micro-pump
.
- **Details**: Make sure the reservoir is well sealed and the connection to the micro-pump is secure
..
6
.
**Battery Connection**
- **Description**: Insert the rechargeable battery into its place
,
connecting it to the control circuit to power the device
.
- **Details**: The battery must be
Информация
Checkpoint & LoRA

Checkpoint
SeaArt Infinity
#Реалистичный
#SeaArt Infinity
0 комментариев
0
0
0
SeaArt: Удобные AI Apps
Генерация видео с помощью ИИ
Освободите своё воображение, и ИИ создаст для вас визуальные чудеса
Бесплатная онлайн смена лица
Быстро создавайте забавные и реалистичные видео и фотографии с изменением лица
Фильтр Studio Ghibli
Превратите любую фотографию в уникальное искусство в стиле Ghibli всего за один клик.
Создатель мультяшных аватаров
Превратите ваши фотографии в уникальные мультяшные аватары мгновенно.

Виртуальная примерка одежды
Примерьте любую одежду виртуально с помощью ИИ
Фильтр Дисней
Мгновенно преобразуйте свои фотографии в персонажей Disney.
Исследовать больше AI-приложений