
How to Train Your Exclusive LoRA Model? Beginner's Guide 03 - Model Evaluation: Manually Select Your Best Model
Introduction
Hello, SeaArt model trainers! In the previous chapter, we carefully set up all training parameters like a chef preparing ingredients, and wrote a perfect "spell"—the preview prompt.
Now, when you excitedly click the Start Training button, congratulations, you've entered the most crucial stage of the entire LoRA training process!
In this chapter, we'll accomplish two major tasks:
1. Learn to understand the training monitoring UI to track your model's "growth" status in real-time.
2. Learn to conduct scientific evaluations after training and, like a professional judge, select the most brilliant "Best Choice" from numerous results!
Last Chapter Recap
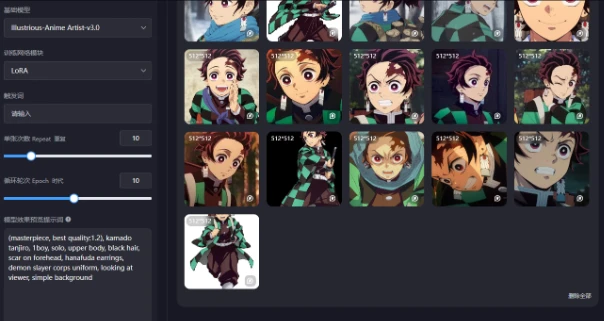
After preparing your dataset, you need to fill in the preview prompt, which is the generation prompt for real-time sample images.
Taking "Demon Slayer" Tanjiro Kamado as an example, an excellent preview prompt should be concise, highlight core features, and include universal high-quality tags.
Prompt: (masterpiece, best quality:1.2), kamado tanjiro, 1boy, solo, upper body, black hair, scar on forehead, hanafuda earrings, demon slayer corps uniform, looking at viewer, simple background
Prompt Analysis:
(masterpiece, best quality:1.2)
Function: This is a universal "magic spell" to enhance image quality, significantly improving details and overall aesthetics. ":1.2" indicates a slight strengthening of its effect.
kamado tanjiro
Function: This is the Trigger Word you set for the model. It's the key to activating and calling this LoRA model. Make sure it matches what you filled in the training settings.
1boy, solo, upper body
Function: Defines the subject and composition. 1boy specifies gender, solo indicates a single person, and upper body specifies a half-body portrait. This is very efficient for initially judging how well the model reproduces the character.
black hair, scar on forehead, hanafuda earrings, demon slayer corps uniform
Function: These are the character's core feature words. Including these in the preview allows you to directly check how well the model has learned Tanjiro's most important features (black hair, forehead scar, hanafuda earrings, demon slayer uniform). If these are consistently reproduced, it indicates the model is training well.
looking at viewer
Function: Specifies the gaze direction. Having the character look directly at the camera is an excellent way to test the accuracy of facial features and structure.
simple background
Function: Simplifies the background. When testing the model's main subject effect, we want the visual focus to be entirely on the character. Using a simple background avoids environmental elements interfering with our judgment.
Enter this prompt into the "Model Effect Preview Prompt" input box, and the system will generate preview images during training, allowing you to understand the training progress and general effect in real-time.
Part One: Real-time Monitoring, Understanding Your Training Command Center
After clicking Start Training, the interface before you is your training monitoring center. It may seem information-heavy, but don't worry—we'll break it down into three sections for clarity.
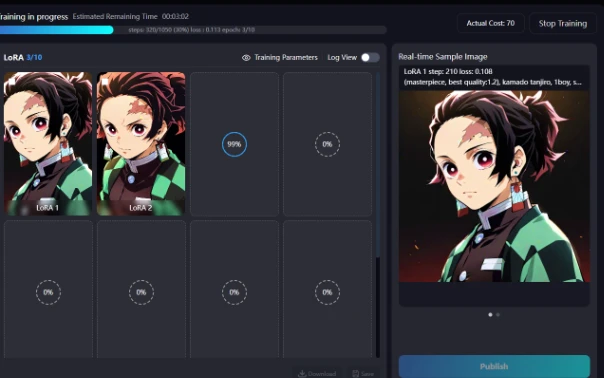
1. Top Dashboard: Your "Global Cockpit"
This is the global status bar, displaying the core training information.
Training in progress: Tells you that training is ongoing.
Steps: The "steps" of training are the basic unit of training volume.
Loss: THE MOST IMPORTANT METRIC! You can understand it as the "error rate" of the model. The lower the loss value, the better the model is learning. Seeing this number continuously decrease means everything is going well!
Epoch: Represents how many times your model has "seen" all training images.
Stop Training: An emergency stop button. If you notice the loss value increasing instead of decreasing, you can press it anytime to cut losses.
2. Left Main Stage: Your "Results Arena"
This area is the core stage for viewing the model's "performance reports.
Default View: Epoch Sample Grid
This is our most commonly used view. Whenever an Epoch training ends, the system automatically generates a "report image" and hangs it on this "results wall." By comparing the images of LoRA 1, LoRA 2, LoRA 3... side by side, you can intuitively see the model's "growth" trajectory.
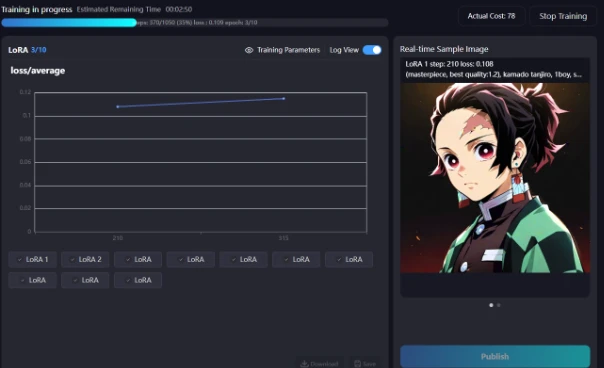
Log View: The Model's "Professional ECG"
Click Log View to see a curve chart of loss value changes. A healthy, smoothly downward curve is the best proof of stable model learning!
3. Right Sidebar: Live Broadcast
This shows the latest preview image being generated in the current step. When this Epoch is completed, this image will be stored in the "results wall" on the left. Now, through the above monitoring, you may feel that Epochs 6-8 look good. But don't rush to conclusions! Small preview images can't tell the whole story. The real test begins after training is complete! (If you're already experienced or have lower requirements, simply choose the LoRA you're satisfied with, save, and publish it. If you need further judgment, save several of the better ones first.)
Part Two: Ultimate Evaluation, Manually Select Your Best Model
"Ding!" As the progress bar reaches 100%, training is complete! Now, your "results wall" is filled with 10 different versions of the model. How do we choose the best one? Preview images are just the "preliminary selection"; next comes the "finals"—manual precision testing!
Step 1: Design Your Testing Plan
Our goal is to create a clear comparison chart to examine the effects of two key variables: "different training cycles (Epochs)" and "different model weights (Weight)."
1. Click on your avatar, enter your personal center, then the Model tab, and find the model you just saved.
2. Fix test parameters to ensure variables are unique:
● Choose a base large model you commonly use.
● Write a test prompt different from the preview, which can be slightly more complex, such as changing the pose or expression to test the model's generalization ability. For example: kamado tanjiro, smiling, full body, dynamic pose, ...
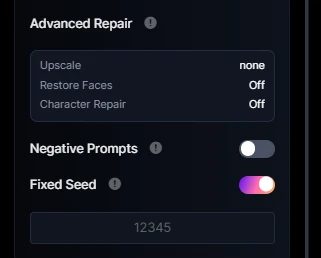
● Find and fix the Random Seed! Enter a number you like (such as 12345). This ensures that the composition of each generated image is mainly consistent, which is the "anchor" to ensure our evaluation is fair and just.
Step 2: Start Generating Images, Collect Data!
Now, let's collect data rigorously like conducting a scientific experiment.
1. Test LoRA 5: In the LoRA selection area, load your LoRA 5 model.
● Set the LoRA weight to 0.7, generate an image, and save it.
● Keep all other parameters unchanged, change the weight to 0.8, generate, and save.
● Change the weight to 0.9, generate, and save.
2. Test LoRA 7: Switch to the LoRA 7 model. Repeat the above operations, generating and saving images at weights of 0.7, 0.8, and 0.9.
3. Test LoRA 9: Switch to the LoRA 9 model, repeat the above operations again.
(We usually select a few LoRAs that look promising, such as mid-term, mid-to-late term, and late-term, for testing. This is more efficient.)
Step 3: Assemble and Analyze Your Comparison Chart
Now, you have 9 test images. Open any collage software you're comfortable with (even Word works), and create a 3x3 grid.
(Or you can directly compare in the creation flow page. But for beginners, this table can help you understand intuitively.)
- Use "model weight" as the horizontal axis (0.7, 0.8, 0.9).
- Use "training cycle" as the vertical axis (Epoch 5, 7, 9).
Drag your saved images into the corresponding cells one by one.
You will get an "effect comparison matrix" like the one below!
| Weight 0.7 | Weight 0.8 | Weight 0.9 | |
|---|---|---|---|
| LoRA 1 |  | 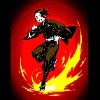 |  |
| LoRA 3 |  | 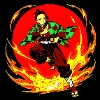 |  |
| LoRA 9 | 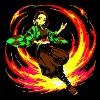 | 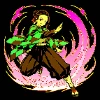 | 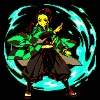 |
Step 4: Find the "Best Choice" from the Images!
Now, gaze at your comparison chart and start looking for the best answer!
● What is "Underfitting"?
⚪ Observation: In our practical case, the LoRA 1 model drew the wrong character "Nezuko" instead. Or in your test, the character features are blurry and don't resemble your training dataset at all.
⚪ Conclusion: This indicates the model hasn't learned enough in the early stages and is called "underfitting." Discard it without hesitation!
● What is "Overfitting"?
⚪ Observation: Look at the LoRA 9 model. The character's face begins to appear stiff and deformed, the colors are oversaturated, and the shadows are pitch black, giving a "burnt" feeling.
⚪ Conclusion: This indicates the model has "learned too much and became stupid" in the later stages, losing its generalization ability. This is called "overfitting." Discard it without hesitation!
● Finding the "Best Balance Point"!
Carefully examine the middle cells. When you find an image where the character features are most accurately reproduced, the details are richest, and the overall visual effect is most natural and comfortable—congratulations! This is your "Best Choice"!
⚪ Observation: Finally, we see the LoRA 3 model! It reproduces character features most accurately, has rich details, and the overall visual effect is most natural and comfortable.
⚪ Conclusion: Congratulations! This is your "Best Choice"! The cell it's in tells you this LoRA model's Best Model Version and Best Usage Weight! In our case, the conclusion is: LoRA 3 model, with weight 0.8, has the best effect!
Chapter Summary
● Great! Through this comprehensive chapter, you've mastered: How to monitor the entire training process like a commander.
● How to design and execute a rigorous evaluation plan like a scientist.
● How to find the perfect work from numerous results, using your eye and data, like an artist.
Now, what you have is no longer a vague "Tanjiro LoRA," but a precise "instruction manual": LoRA 7 model file + Recommended weight 0.8. You are now a qualified LoRA trainer! So, what if the effect of our first training model is still not ideal? How do we "remake" it? In the next chapter, we'll enter the advanced section and learn model diagnosis and iterative optimization techniques! See you in the next chapter!
日本語版
LoRAモデルのトレーニング方法 - 初心者必見03-モデル評価:手動で最適なモデルを選び出す方法
はじめに
SeaArtでモデルトレーニングに取り組む皆さん、こんにちは!前回は、シェフが料理の準備をするように、トレーニングパラメータを細かく設定し、理想的なプレビュープロンプトという「魔法の言葉」を作成しました。
これで準備は万端です!「今すぐトレーニング」ボタンをワクワクしながらクリックした瞬間から、おめでとうございます、LoRAトレーニングの最も重要な段階に突入したことになります。
この章では、一気に次の二つの重要な課題に取り組んでいきましょう:
1.トレーニングモニターの見方をマスターし、モデルの成長をリアルタイムで把握する方法
2.トレーニング完了後に評価を行い、多くの成果の中から、プロの審査員のように最も輝く「理想のモデル」を見つける方法を学ぶ
前回の振り返り
データセットを準備した後、プレビュープロンプトを入力します。これがリアルタイムサンプル画像の生成プロンプトとなります。
『鬼滅の刃』の竈門炭治郎をトレーニングする例では、優れたプレビュープロンプトは簡潔で、核心的な特徴を強調し、汎用性の高い質の良いタグを含むべきです。
プロンプト:(最高傑作、最高品質:1.2)、竈門炭治郎、一人の少年、ソロショット、上半身、黒髪、額の傷痕、特徴的な花札の耳飾り、鬼殺隊の隊服、視聴者を見つめる、シンプル背景
プロンプト各要素の詳細解説:
(最高傑作、最高品質:1.2)
役割:これは画質を高める万能の「魔法の言葉」です。画像の細部から全体的な美しさまでを大幅に向上させます。「:1.2」という数値はその効果をさらに強めています。
竈門炭治郎 役割:モデルに設定したトリガーワードです。このLoRAモデルを呼び出すための合言葉となるため、トレーニング設定で指定したものと一致させることが重要です。
一人の少年、ソロショット、上半身 役割:画像の主体と構図を決定します。「一人の少年」で男性キャラクターであること、「ソロショット」で単独の人物であること、「上半身」で上半身のショットであることを指定します。これらはモデルの基本的な再現性を効率よく確認するための設定です。
黒髪、額の傷痕、特徴的な花札の耳飾り、鬼殺隊の隊服 役割:キャラクターの決定的な特徴を指定します。これらのキーワードを入れることで、炭治郎の最も重要な特徴(黒髪、額の傷、花札の耳飾り、鬼殺隊の制服)がどれだけ正確に学習されているかを直接確認できます。これらの特徴が?して再現できていれば、モデルは良好にトレーニングされていると判断できます。
視聴者を見つめる 役割:視線の方向を指定します。キャラクターが正面を向いている構図は、顔の特徴や表情の再現性を最も効果的に確認できる方法です。
シンプル背景
役割:背景を単純化します。モデルの性能を評価する際は、キャラクター自体に集中したいため、シンプルな背景を指定することで余計な要素による判断の妨げを防ぎます。
このプロンプトを「モデル効果プレビュープロンプト」欄に入力すると、トレーニング中にシステムが定期的にサンプル画像を生成し、モデルの成長の様子をリアルタイムで確認することができます。
パート1:リアルタイムモニタリング - トレーニング管理センターの使い方
今すぐトレーニングをクリックすると、目の前に表示されるこの画面があなたのトレーニングモニタリングセンターです。情報量が多く見えるかもしれませんが、ご心配なく。これを三つの部分に分けて見ていけば、一目瞭然になります。
1.トップパネル:あなたの「グローバルコックピット」
これはグローバルステータスバーで、トレーニングの最も核心的な情報を表示しています。
トレーニング中:トレーニングが進行中であることを示します。
steps:トレーニングの「ステップ数」で、トレーニング量の基本単位です。
loss:【最も重要な指標!】簡単に言えば「モデルのエラー率」です。lossが低いほど、モデルの学習が良好であることを意味します。この数値が徐々に小さくなっていくのを見れば、すべて順調だということです!
epoch:モデルがすべてのトレーニング画像を完全に「見た」回数を表します。
トレーニングを停止:緊急停止ボタンです。もし損失値が下がらず上昇していることに気づいたら、いつでもこれを押して、タイムリーに損失を止めることができます。
2. 左側メインステージ:あなたの「成果アリーナ」
このエリアはモデルの「成果発表」を見るための中心的なステージです。
デフォルトビュー:エポックサンプルグリッド
これは最もよく使用するビューです。エポックトレーニングが終了するたびに、システムは自動的に「レポート画像」を生成し、この「成果ウォール」に掲示します。LoRA 1、LoRA 2、LoRA 3…の画像を並べて比較することで、モデルの「成長」軌跡を非常に直感的に見ることができます。
ログビュー:モデルの「専門心電図」
「ログビュー」をクリックすると、損失値の変化曲線グラフが表示されます。健康で滑らかな下降曲線は、モデルが?して学習している最良の証明です!
3. 右サイドバー:リアルタイム配信ルーム
ここには現在のステップで生成されている最新のプレビュー画像が表示されます。このエポックが完了すると、この画像は左側の「成果ウォール」に保存されます。これまでのモニタリングから、エポック6-8あたりが良さそうだと感じているかもしれません。ただ、もう少し慎重に見てみましょう。小さなプレビュー画像だけでは全ての状況を判断できません。真の評価は、トレーニング終了後に始まります(経験豊富な方や、要求がそれほど高くない場合は、気に入ったLoRAを選んで保存・公開するだけで構いません。さらに詳しく判断したい場合は、まず良さそうなものを何点か保存しておきましょう)
パート2:最終審査、手動で最適なモデルを選び出す
「チン!」進捗バーが100%に達し、トレーニングが完了しました!今、あなたの「成果ウォール」には10種類の異なるバージョンのモデルが掲示されています。最適なものをどのように選べばよいでしょうか?プレビュー画像は単なる「予選」に過ぎません。次に行うのは「決勝戦」—手動での精密テストです!
ステップ1: テスト計画を設計する
目標は「異なるトレーニング周期(エポック)」と「異なるモデルの重み(ウェイト)」という2つの重要な変数の組み合わせ効果を検証する、明確な比較画像を作成することです。
1.プロフィールアイコンをクリック-個人センターに入る-モデル(保存したモデルを選択)
2.テストパラメータを固定し、変数を一つに限定:
● 普段使用している基本の大規模モデルを選択
● プレビュー時とは異なるテストプロンプトを書きます。モデルの汎化能力をテストするために、少し複雑にしても構いません。例えば、ポーズや表情を変えるなど。例:竈門炭治郎、笑みを浮かべた表情、全身ショット、躍動感のあるポーズ、…
● 【ランダムシード(Seed)】を見つけて固定します!好きな数字(例:12345)を入力します。これにより、毎回生成される画像の構図が基本的に一致し、評価の公平性と正確性を保証する「揺るぎない基準」となります。
ステップ2: 画像の生成を開始し、データを収集する!
今から、科学実験のように厳密にデータを収集していきます。
1.LoRA 5をテストする: LoRA選択エリアで、LoRA 5モデルをロードします。
● LoRAの重みを0.7に設定し、画像を1枚生成して保存します。
● 他のすべてのパラメータを変えずに、重みを0.8に変更し、生成して保存します。
● さらに重みを0.9に変更し、生成して保存します。
2.LoRA 7をテストする: LoRA 7モデルに切り替えます。上記の操作を繰り返し、重みが0.7、0.8、0.9の時にそれぞれ画像を生成して保存します。
3.LoRA 9をテストする: LoRA 9モデルに切り替え、再び上記の操作を繰り返します。
(通常、効率を高めるために、中期、中後期、後期など、可能性がありそうなLoRAをいくつか選んでテストします。)
ステップ3: 比較画像の組み立てと分析
今、あなたは9枚のテスト画像を持っています。使いやすい任意の画像編集ソフト(Wordでも可能です)を開き、3x3のグリッドを作成します。
(または、創作フローページで直接比較することもできます。しかし初心者にとっては、このテーブルが直感的に理解しやすいでしょう)
「モデルの重み」を横軸にします(0.7、0.8、0.9)。
「トレーニング周期」を縦軸にします(エポック5、7、9)。
保存した画像を、対応するマス目に一枚ずつドラッグします。
これで下記のような「効果比較マトリックス図」が完成しました!
| 重み 0.7 | 重み 0.8 | 重み 0.9 | |
|---|---|---|---|
| LoRA 1 |  |  | 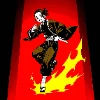 |
| LoRA 3 | 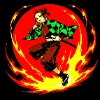 |  | 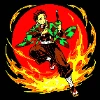 |
| LoRA 9 |  |  |  |
ステップ4: 画像から「理想のモデル」を見つけ出す!
さあ、比較画像をじっくり見て、最適な答えを探し始めましょう!
● 「過少適合」(Underfitting)とは?
⚪現象:実践例では、LoRA 1モデルが描いたキャラクターは間違って「禰豆子」になっています。あるいは、キャラクターの特徴があいまいで、データセットとの類似性が見られません。
⚪結論:これはモデルが初期段階でまだ十分に学習できていない状態で、『過少適合』と呼びます。このバージョンは使用しないようにしましょう。
● 「過剰適合」(Overfitting)とは?
⚪現象:LoRA 9モデルを見てみましょう。キャラクターの顔が硬直・変形し始め、画像の色彩が油っぽく、影が真っ黒で『焦げた』ような印象があります。
⚪結論:これはモデルが後期段階で学習しすぎた状態で、汎化能力を失っています。これを『過剰適合』と呼びます。このバージョンも使用を避けましょう。
● 「最適なバランスポイント」を探す!
真ん中のマス目をよく見てください。人物の特徴が最も正確に再現され、画面の細部が最も豊かで、全体の見た目が最も自然で心地よい一枚の画像を見つけたとき——おめでとうございます!これがあなたの『理想のモデル』です!
⚪現象:最後に、LoRA 3モデルを見てみましょう!キャラクターの特徴が最も正確に再現され、画像の細部が豊かで、全体的な見た目が最も自然で心地よいです。
⚪結論:おめでとうございます!これが、あなたの「理想のモデル」です!このマス目の位置が、このLoRAモデルの【最適なモデルバージョン】と【最適な使用重み】を示しています。この例では、LoRA 3モデルが重み0.8のときに最も効果的という結果が得られました!
本章のまとめ
● 素晴らしい!この章の一連の学習を通じて、あなたは以下のスキルを身につけました:指揮官のように、トレーニング全体のプロセスを監視する方法。
● 科学者のように、厳密な評価計画を設計し実行する方法。
● 芸術家のように、多くの結果の中から、目利きとデータを頼りに、最も完璧な作品を見つける方法。
今、あなたが手に入れたのは、漠然とした「炭治郎LoRA」ではなく、精密な「使用説明書」です:【エポック7のモデルファイル】+【推奨重み0.8】。あなたはすでに一人前のLoRAトレーナーです!では、最初のトレーニングでモデルの効果がまだ理想的でない場合、どのように「作り直す」べきでしょうか?次の章では、上級編に入り、モデルの診断と反復最適化テクニックを学びます!次章でまたお会いしましょう!